Nineteen Rooms, Six Years, One War
A section-by-section route through the Cabinet War Rooms, the Map Room, and the Churchill Museum — in the order that makes sense.
Get your free guide
Enter your email to unlock the full room-by-room guide. One email unlocks all London museum guides.
Free · No spam · Unsubscribe anytime
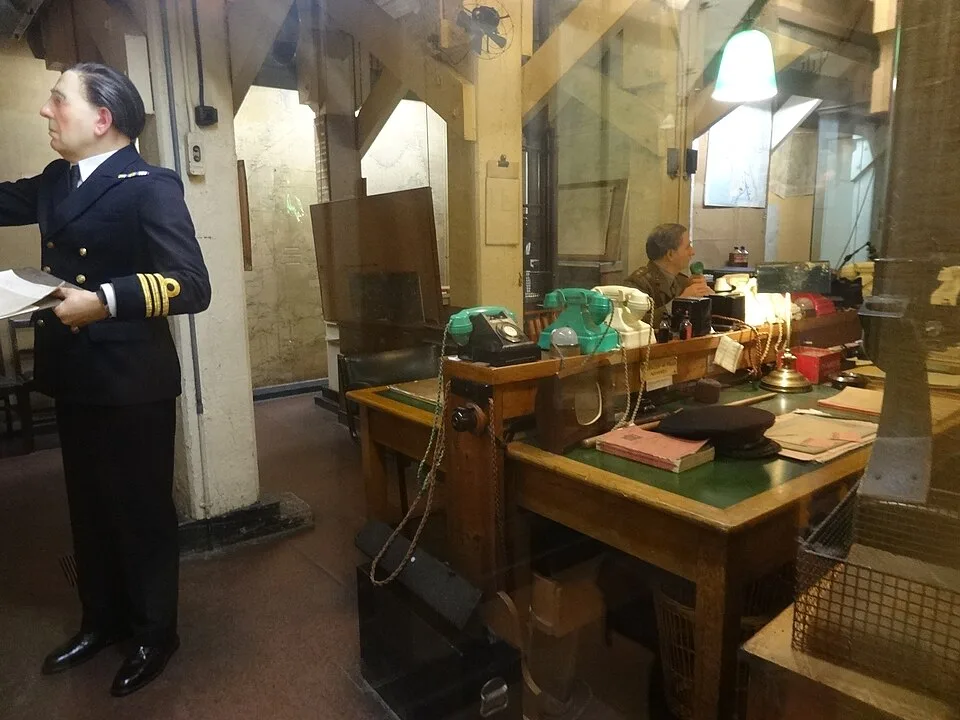
The Cabinet War Rooms were left exactly as they were on 16 August 1945. The light in the Map Room has not been switched off since.
Begin at the Map Room — the largest room in the complex. Take time with the Atlantic convoy map: the pinholes around Gibraltar are so dense a section was patched. Move through the Cabinet War Room (find the scratch marks on Churchill's armrests), then his bedroom-office, where the chamber pot is still under the bed and the BBC broadcasting equipment is still in the corner. The Transatlantic Telephone Room is viewable through glass — read the description before moving past.
Before leaving the Cabinet War Rooms section, look for the desk drawer display near the Map Room exit. Three sugar cubes found here by IWM curators in the 1980s belonged to Wing Commander John Heagarty — a week's ration, kept in a drawer for five years. One cube has shavings taken off it. That detail — someone carefully rationing sugar while the war ran from the next room — anchors the whole place.
Emerge into the Churchill Museum, which is brighter and more openly laid out than the bunker. Head for the Lifeline table in the centre — a 10-metre interactive touchscreen running Churchill's biography chronologically. Don't rush it. Navigate to 1915 (Gallipoli) and 1930–1939 (the Wilderness Years): these are the sections that explain who the man in the Cabinet Room actually was, and why his return to power in 1940 was not inevitable.
Peak crowds arrive 10:30–14:00. The 09:30 opening slot on a weekday — or 09:00 on Fri/Sat, and daily from June–Aug 2026 — gives you the bunker corridors before tour groups and school parties arrive. The difference in the Map Room at 09:35 versus 11:30 is considerable.
The included multimedia audio guide is genuinely good for the first half of the Cabinet War Rooms. By the Transatlantic Telephone Room, most visitors have absorbed the context and find they move faster without it. Keep the device — some rooms add detail the placards skip.
Your ticket is valid for a 30-minute arrival window from your booked slot. Arriving at 09:30 for a 09:30 slot means you can enter any time 09:30–09:59. Arriving late puts you in a later crowd wave — and risks being turned away at the gate.
Most visitors spend 10 minutes on the Lifeline table and move on. The sections covering 1915 (Gallipoli fallout) and 1930–1940 (the Wilderness Years) are where the map between the politician and the wartime leader becomes clear. Budget 20 minutes here, not 5.

Why it matters: The Map Room tracked every convoy crossing the Atlantic, carrying food, fuel, and ammunition to Britain. Officers moved pins daily. Around the Strait of Gibraltar the pinholes are so dense — representing thousands of convoy movements — that a section of the original map had to be patched with new paper.
What to notice: Look at the room as a whole before examining the maps in detail. Everything here was left exactly as it was on the last day of the war — 16 August 1945. The light has not been turned off since. The telephone handsets, the ticker-tape machines, the wooden furniture: none of it has been staged.

Why it matters: The U-shaped table seated Churchill and his War Cabinet for the decisions of the entire conflict — the entry of the US, the Normandy planning, the response to the Blitz. The chair at the centre, high curved back, was Churchill's. The scratch marks on the armrests are from six years of wartime pressure.
What to notice: Sit (mentally) in the chair across the table from Churchill's position and look at what he would have looked at: maps, officers, the door. The room has no windows. No natural light. Every meeting in here was conducted underground, with London being bombed above.

Why it matters: The Lifeline table maps Churchill's entire life chronologically on a 10-metre touchscreen — family photographs, film clips, documents, interviews with those who worked with him. It is the most concentrated resource on Churchill's biography in any museum, and it was designed to be navigated non-linearly.
What to notice: Navigate to 1915 (the Gallipoli campaign) and 1929–1939 (the Wilderness Years). These are the decades where Churchill's career appeared to be finished — twice. Understanding those periods is what makes the bunker downstairs make sense. The man who ran the war from those nineteen rooms had already been written off as a failure once.
How well did you look?
3 quick questions about what you just saw
Visit complete!
Share your visit or save it for later
Your collection